Monday, August 23, 2010

Tau Terrain - Crashed Lander

I've always been impressed with the crashed Aquila Lander that GW included with the Battle for McCragge boxed set.  The idea that terrain needn't be just ruined buildings and foliage was exciting.  I experimented with a few models of my own:  wrecked Dread Naught, burnt out automobiles and mass grave pits.  All were kinda fun to build and gave a slightly more grim feel to the game, but lacked any great versatility as they were mostly single piece terrain.  I wanted something a bit more complex, larger but without dominating the table.  The result was my own take on the crashed lander but with a Xenos twist: The Tau Lander.
Battle Suit to show scale


The ship itself is from the sci-fi story Perry Rhodan and is called the Glador.  The kit was fairly unimpressive and had been knocking around on my hobby table until it got knocked off the table.  That's when the idea hit me to build a xenos version of the Aquila Lander. The crater walls are polystyrene, plaster and HO scale coal all coated in a heavy application of glue.  The lander was called the Twin Blade.  Here's some more photos.  Enjoy!

UPDATE
The Lander terrain is now on consignment at Great Escapes Games.

Sunday, June 20, 2010

Old Collectable to Functional Terrain

A few years back these cold cast statues were released for Warhammer 40K.  I bought two, one of the Firewarrior and the other a Space Marine.  During a recent foray into some storage boxes, I found the Space Marine...off his base and busted.  Seems that was one of the boxes that got dropped during a move.  It happens and isn't the end as I'm well versed in the repair of fragile collectibles.  As I worked on the statuette, I got an idea: why not convert it to terrain. GW has released several monument styled models for use in Imperial settings, this statuette is just the right for that job.  So, with a few rough ideas, materials and a handful of hours, I was able to produce this monument to the tactical marine.

Enjoy.

Thursday, May 13, 2010

Field Testing BatRep 20100512


Here's the set up:
Capture and Control, Spearhead, 1750.

Goals: Training game for the Great Escape Games' Contest of  Champions 1750 tourney.  Both my brother and I are trying out some recent tweaks to the lists.  For him, it's a no frills mechanized army with meltas,heavy flamers and late game outflanking.  For me, I'm exploring the possibilities of Piranhas and Monats Deep Striking: late game objective rushing.

Marc loads everything but the Vendetta and Valk onto the board.  I place a scoring Devilfish with Firewarriros, the Hammerhead, both Broadside teams and the HQ goes as close to "Boot Hill" as possible. Two DF, Piranha and the three Monats are in reserve.  It seems clear we're both going for a late game rush on our opponent's objectives.

Marc has turn one and immediately begins pounding away at the HQ.  I loose both bodyguards.  Unlike most other players I face, Marc's not ignoring my Broadsides and makes good a few direct hits to start working on them.  On my turn, I launch missiles and Plasma riffle from the HQ with no real effect.  The Broadsides and Hammerhead begin dismantling the Chimeras to get to the troops inside. One pops and dumps the survivors.  The Hammerhead delivers a pie full of sub-munition and his troops eat it up.

Turn two: The Vendeta arrives outflanking opposite side of my Objective. He begins to push across his deployment zone with three Chimeras then his las-can teams pulp the Commander.  I loose a drone off Beta Team Broadsides as well. I manage two Monats to Dead Center behind his Vendetta.  The 'El AFPs the deployed team and the TL MP immobilizes the Vendetta; Broadside Beta then Shakes it.  On the IG side of the board, I focus my Railguns on the advancing Chimeras.  Lots of cover on the board, my set up is pretty terrain heavy...which some would complain about being too distracting. 

Turn Three to Five:  I'm seeing an effective draw here.  With his Valk arriving then wrecked, the loss of one of my Broadside teams and the shredding of both my Monats, its down to his creeping Chimeras and the second of my Devilfish with the Piranha as support. In a selfish act of preservation, I don't race the Piranha up as originally intended.  Bad choice, it becomes the focus of IG fire for the next two turns until it's demise in turn five.  In the meantime, the Tau have managed to cripple two of the three remaining Chimeras and fend off an assault of IG with Firewarriors.  The FW get cut down by return fire in turn six after routing the IG, but the decidedly non-Tau move pays off again and draws fire away from my castle.  By turn Six, Marc has run a Chimera right up to my doorstep.  The Devilfish, Broadsides and Hammerhead go Robotech on the disembarked passengers and take them out to the man in the fifth turn.  I've no pressence even near his deployment zone let alone his Objective; not for trying with one last Monat's attempt to deepstrike and fail.  The game goes to turn six and here we see the Tau do what they're not supposed to be able to do.  The last Chimera makes a 12" rush on my Objective. Railguns fail to do anything but shake and stun. Then the Broadsides assault...out of six dice, one penns and rolls a five.  The game draws.


Friday, February 26, 2010

Battle Report - Weds 24 Feb 2010

GREETINGS.

Here's a summary of Wednesday's game at Great Escapes Games:
IG vs Tau at 1500
Pitched Battle/Annihilation (AGAIN!!!)

Tau won the initiative but yielded it to IG with the idea of being
able to see how the IG would set up and be able to score the
last KP of the game.

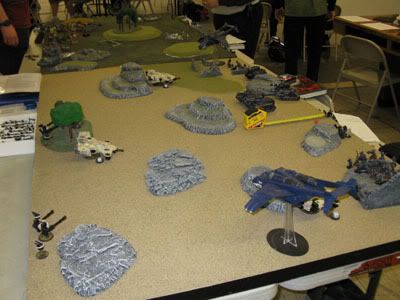
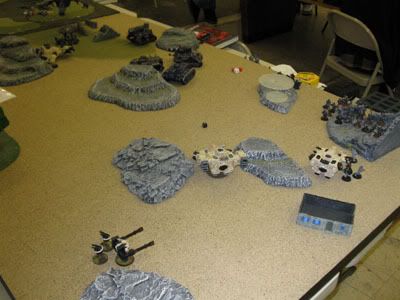
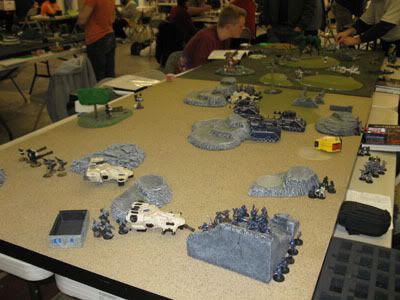
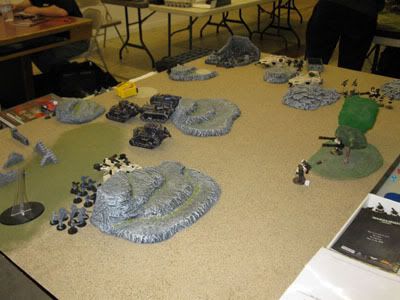
Here's the deployment:


and from the other end of the table:


As you can see, the Tau should work more on deployment...
Which would prove to be their bane for the game.

Turn one saw moderate weapons fire and the Infiltrated
Stealth Team began to work on the Guard holed up in the
pillbox (The "newer" looking bit at the North West corner) in
classic Jump Shoot Jump style.

Turn Two brought in both the second Stealth Team and the
Monat TLFB/SG Crisis suit (called the Arbiter).  Concentrated
fire then brought down the Hellhound.  The IG began to bomb
the board in earnest.

Turns Three and Four were straight attrition as both sides
worked the dice.  Tau rolled a 14 for Armor Pen!


However cool that was...it's still a cocked die and had to be
rerolled for a stellar null effect on the Russ.

By the top of the Fifth Turn, both Stealth Teams, the Arbiter, a Devilfish, a
6 man Firewarrior Team and 2 man Broadside Team decided
they'd had enough and left courtesy of the IG.  The Commander had been playing prairie dog with the Vets via the hanger which has no fire points.  The Vets got bored and booted out.

Closing of the Fifth: Tau 1, IG 6

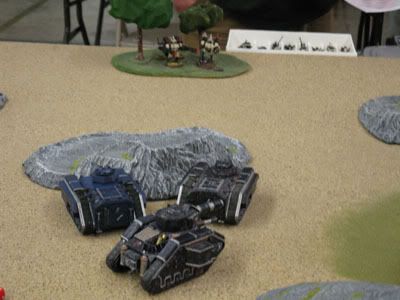
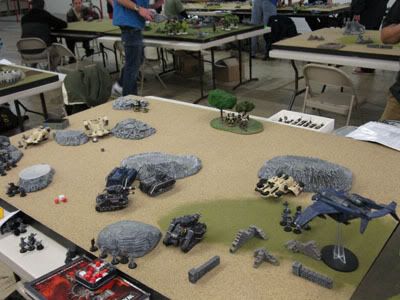
Here are some more photos of the well painted IG and WIP Tau:

Tuesday, February 9, 2010

Battle Report: IG vs. Tau 1500 points

originally posted by me on the Great Escapes Games forum...go check it out!


BatRep: 05-02-2010: Friday Night 40K League

Opponents: Chris (Tau) and Chris M (IG) at 1500


This was a great game with lots to learn from.

Our game started off with a stellar roll: Annihilation, Dawn of War. The Tau won the initiative; the IG attempted to seize and did not.
Turn one saw every unit enter the board except the Pathfinders and Stealth Team. Tau took to the center of the board with HQ and Broadsides. To either side of the table were a team of Firewarriors in Develfish. The IG set up fairly evenly…I’ll try to recall all the units: two Russes, a Demolisher and two Chimeras at center with a Vendetta at either end and the HQ with a Combined Squad camped out in area cover and behind hills. By the end of turn one, it was very clear that the Demolisher would be the bane of the Tau.

Mid Game: the IG was well ahead having taken out both Firewarrior Teams' Devilfish and a Firewarrior team. The Tau HQ lost all its Drones as did the accompanying Broadside. The second Broadside did well against the Vendettas, downing both and forcing the IG out; however, once on the ground, the North end squad (forced out of the downed Vendetta) pacified the disembarked Firewarriors from a previous Destroyed Devilfish. Near the end, the Stealth Team finally “materialized” and attacked the North end squad, eliminating them. While the Broadsides worked feverishly to wreck a few more armor, the IG hung back and relied on its cover to last the day. By game’s close, it was Tau 3, IG 5.

This Commander’s Retrospect:

After my deployment, I made several key mistakes: most notorious was attempting to press inwards with the Fish/Warriors and Pathfinders instead of falling back to the hills and staying out of LOS. Disruption Pods do wonders at keeping 4 shots, that don’t need line of sight, on the table…if you make the rolls. I didn’t need to gamble that as there was no need for the Fish/Warriors to be active in this fight. The Pathfinders would have had plenty of room in the area cover that I had. The other mistake was keeping the Stealthteam in reserve. They did their points worth once in and could have done more if brought in on turn one. Aside from the Devilfish (which failed their Obscured rolls epically) , they were my most mobile and hard to hit unit.

The Tau doesn’t do attrition, assault or armor very well (they really can’t “surf”). What they do well is bend the rules of the game with Jet Packs, Smart Missiles and Markerlights...essentially; they hide and sap their opponents until either the force in ineffectual to the mission or charging into a kill zone. Each time I've tested a tactic counter to this, it ends very badly. The key will be to minimize my army's footprint and cover its tracks.

Chris M took the photos. We agreed that set up, mid game and closing would be enough with alternate vantage points.


Thursday, January 21, 2010

Selling off my War Table...

I'm selling this two part 4'x4' table to make way for a larger, single piece table.  The table is composed of two 2'x4' pieces made of wood.  As you can see, I've reinforced the underside to keep the thing level.  I used this laid across a 3' x 4' folding table.  The texture is very light and was achieved with a rattle can of textured paint.  Paint was then sprayed on in layers and sealed in a semigloss over coat. There is no flock, grass or surface detail as I intended to make several area terrain pieces that could be moved about for different effects.  The edges are painted black.  Both tables can be easily lifted by an average sized adult in decent health.  I have them currently leaning up in the entry way as temporary storage.

If you're interested in purchasing these, respond to the Craig's List Ad I have.  I'll remove this post, the ad and the link when the table sells.

I'm asking cost of materials with a little extra to compensate the time to put it all together:  $25 each or both for $40.  I'm looking for Sacramento local sales only unless you're willing to drive here to pick them up.